

The most important part of a wedding is the bride and groom, but it isn't always easy to find something that both members of the couple can enjoy.
If you're struggling to find something unique and memorable for that newly engaged couple, consider making this etched glasses set. Adding personal flair to gifts is a great way to gIve the recipient that extra bit of joy!
***Disclosure: Some of the links below are affiliate links, meaning at no additional cost to you, I will earn a commission if you click through and make a purchase.
What is etched glass?
Etched glass is a popular project that requires minimal supplies and is easy to complete. This DIY project only takes a few steps to create a personalized gift or decoration for your home.
Designing custom etched glass can be as simple or as complicated as you want it to be. The process of etching glass is pretty straightforward, but there are a number of ways to go about it. This article will show you the basics of how to make custom etched glasses using your Cricut machine.
Materials needed to etch glass

Glasses
I usually get mine from the dollar store. They have a great variety including mugs, stemless and pint sized!
Paint Brush
Old ones will work just fine. They should probably be clean too.. you know, because this is a new project lol
Scrap Vinyl
The best designs are no bigger than 4” x 4” making this a perfect project to put that scrap vinyl to use. Permanent Vinyl works best since the seal to the glass is a little tighter meaning less leakage but removable vinyl works as well.
Cricut Machine & Mat
Although this project can be made with any of the Cricut family machines, I use the Cricut Maker and standard grip mat.
Etching Cream
You can purchase Armour Etch from Amazon or Michael's!
Weeding Tool
I've had my Maker for a while and still use the Cricut tools that came in the box! Any weeding tool will work.
Scraper
When I purchase the HTVRONT mats from Amazon the come with a yellow spatula so I like to use that as a scraper most times.
Gloves
Disposable or reusable makes no difference!
Transfer Tape
Something not SUPER sticky as you want the stencil to easily adhere to your glass.
Steps to etch glass
1. Design and cut your stencil
Add the "His One Her Only" image to the canvas from design space then create a stencil using a basic square and the slicing tool.


I use matte vinyl from Atlanta Vinyl Store* and cut with the fine tip blade on default pressure.
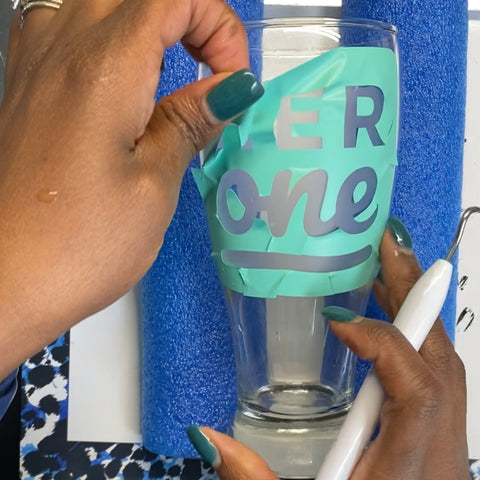
2. Weed and place your stencil
It is very important to weed out the material you want etched on your glass. There should also be material surrounding the entire image or phrase as a way to keep the etching cream from getting on unwanted parts.

Once you've weeded your image, place the transfer tape on top and use your scraper to really burnish the tape to your design. Peel away the vinyl's backing then place the stencil directly onto your glass.

Placing vinyl is so hard for me but I have found that making little slits around the perimeter helps to align the stencil on the the curves of the glass. Do you use that hack too? Do you think it works?
Once the stencil has been placed to your liking, gently remove the transfer tape.

3. Apply etching cream to glass
Use your paint brush to add a generous layer of etching cream to cover the stencil on your glass. There's no such thing as too much but remember to stay within the frame of your stencil.

After a thick coating of etching cream has been applied, let it sit for 5 minutes. Once the 5 minutes have passed, use your paint brush again to rework the etching cream. This is to make sure all the spaces in your stencil have been covered. Set your timer for another 5 minutes and wait.

4. Recycle excess etching cream back into bottle
Once the second 5 minutes has passed, use the paintbrush to scoop off the excess etching cream and put it back into the bottle. This will save you money in the future so this step is very important!
5. Rinse remaining etching cream off glass
With gloves on your hands, and in a circular motion, rinse off the excess etching cream with lukewarm water. The stencil should still be in place but a little movement is OK.

6. Dry glass and remove stencil
Use a microfiber towel to dry your newly etched glass. You may need your weeding tool to remove the stencil from the glass. The frosty look should appear once the surface is completely dry!
7. Marvel at your hard work!

What do you think of your etched glass set? I bet it looks great! Would you complete this process again?
Other etched glass projects to try
Mirror
Cookie Jar
Decanter
Frosted Glasses
My thoughts on etching glass...
When it comes to DIY wedding gifts for your future spouse or bridal party, etched glass is a great option. More and more couples are receiving this type of gift when they’re preparing to get married, and for good reason. It's a thoughtful gift that doesn't break the bank, which is why I wrote this post on how to etch glass. We #BrideOnABudget around here okayyy!
If you are planning a wedding or know someone who is getting married soon, I hope these tips are helpful! Leave a comment below if you need any help deciding what design or saying to have etched onto your glassware. Tag @blueroombride on social media so I can see your projects!
Happy crafting!
Subscribe to Old New Blue's RSS feed using http://blueroombride.myshopify.com/blogs/old-new-blue-blog.atom


1 comment
Thank you so much for this detailed overview. I can’t wait to try this out.